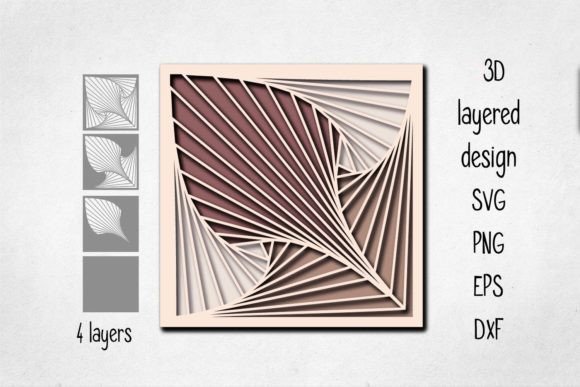
3D Layered Geometric Panel Cut File
Transforming a flat digital file into a tangible, dimensional piece of art is one of the most satisfying aspects of modern crafting. When you dive into the world of laser cutting and vinyl plotting, few designs offer as much visual impact relative to effort as a 3D Layered Geometric Panel Cut File. This isn't just about sticking paper on a wall; it’s about creating depth, shadow, and texture through strategic layering. Whether you are looking to refresh your living space with affordable home decor or seeking a unique, handmade gift that stands out from mass-produced items, this design approach offers a versatile solution for creative minds.
The core concept behind these geometric panels is simplicity in structure but complexity in appearance. The item consists of several distinct layers that, when stacked together, create a three-dimensional effect. What makes this particularly appealing for DIY enthusiasts is the flexibility. You are not bound by a single aesthetic. You can use all available layers to create a dense, intricate pattern, or you might choose to isolate just one or two layers for a minimalist look. Furthermore, the color palette is entirely up to you. While black and white offers a stark, modern contrast, experimenting with vibrant hues, pastels, or metallic finishes can completely change the mood of the final piece.
Real-World Applications for Home and Office Decor
One of the primary reasons creators gravitate toward 3D layered geometric designs is their adaptability to various interior styles. These panels serve as excellent focal points in rooms that feel empty or lack personality. For instance, consider a plain white wall in a hallway or above a sofa. A large-scale geometric panel, cut from cardstock or wood, adds architectural interest without the cost of custom millwork. The interplay of light and shadow across the different layers changes throughout the day, making the artwork dynamic rather than static.
In the realm of gifting, this type of project shines. Friends and loved ones often receive generic store-bought gifts that end up in drawers. A hand-assembled 3D geometric panel is personal and thoughtful. Imagine creating a custom-sized panel featuring a loved one’s favorite colors and placing it in a simple frame. It becomes a statement piece that shows effort and care. This is especially effective for housewarming presents, wedding gifts, or milestone celebrations where a unique keepsake is preferred over clutter.
Beyond residential spaces, these designs are surprisingly effective in professional environments. An office reception area or a co-working space can benefit from the clean lines and modern aesthetic of geometric patterns. A well-executed wooden or MDF panel can convey professionalism and creativity simultaneously. It signals that the space values design and attention to detail, which can leave a lasting impression on clients and visitors alike.
Material Choices and Creative Freedom
The beauty of using a cut file lies in the material options available to you. The recommended materials vary based on the desired finish and durability. Cardstock is the go-to for beginners or temporary displays. It is easy to cut, lightweight, and inexpensive, allowing you to experiment with color combinations without a significant financial commitment. If you want something more durable and textured, wood is an excellent choice. Plywood, MDF (Medium Density Fiberboard), or even thin plastic sheets can be used to achieve a sleek, contemporary look.
When working with thicker materials like wood or plastic, the structural integrity of the layers becomes important. The adhesive used to stack the layers must be strong enough to hold the weight without warping the material. Many crafters use hot glue for speed or strong acrylic adhesives for a cleaner finish. The choice of material also dictates the tool required. A Cricut or Silhouette machine handles cardstock and vinyl effortlessly, while a laser cutter is necessary for precise cuts in wood, acrylic, or thick cardboard.
It is worth noting that you are not limited to solid colors. You can paint the layers before assembly, apply vinyl decals to specific sections, or even use patterned paper for a collage effect. This level of customization ensures that no two projects look exactly alike, giving you full control over the final aesthetic.
Technical Considerations and File Formats
Before starting your project, it is crucial to understand the technical specifications of the 3D Layered Geometric Panel Cut File. You will typically receive a ZIP folder containing multiple file formats to ensure compatibility with various machines. This package usually includes:
- 1 SVG file: This is the standard format for electronic cutting machines like Cricut and Silhouette. It contains all the layers organized in separate groups, making it easy to select and cut individual pieces.
- 1 PNG file: Provided at 300 dpi with a transparent background, this image is useful for visualization purposes or if you need to print a template for manual cutting.
- 1 EPS file: Ideal for vector editing software like Adobe Illustrator, allowing for further customization of the design elements.
- 1 DXF file: Compatible with laser cutting software and some older cutting plotters, ensuring broad usability.
Ensuring your machine is compatible with at least one of these formats is the first step. Most modern hobbyist machines support SVG, making it the most accessible option. However, if you are sending files out to a professional service or using industrial equipment, having the DXF or EPS versions provides peace of mind.
Sizing and Scaling Limitations
Size matters significantly when dealing with layered designs. The default size of this geometric panel is designed to be substantial, measuring over 8 inches (20 cm) at its widest point. This scale allows the geometric details to breathe and the shadows to form properly. However, you have the freedom to resize the design to fit your specific needs.
If you plan to enlarge the design, you generally have fewer constraints, provided your cutting bed is large enough. But if you intend to reduce the size, you must exercise caution. Geometric designs often contain thin elements—delicate lines or small connectors between shapes. When scaling down, these thin parts may become too fragile to cut cleanly or too weak to hold the layers together during assembly. If you find that the scaled-down version looks blurry or loses its definition, it is a sign that the design has been reduced beyond its practical limit. In such cases, sticking to the original dimensions or choosing a simpler, less intricate design might yield better results.
Ultimately, the success of your 3D Layered Geometric Panel depends on balancing creativity with practicality. By understanding the materials, respecting the technical limits of scaling, and leveraging the versatility of the included file formats, you can create stunning pieces that elevate any space. Whether you are a seasoned crafter or a curious beginner, this project offers a rewarding blend of artistic expression and technical satisfaction.