Transforming Digital Designs into Tactile Timepieces: The Ultimate Guide to the 3D Clock SVG Laser Cut File CNC File
In the rapidly evolving world of digital fabrication, the bridge between a creative concept and a physical object has never been thinner. For hobbyists, small business owners, and professional makers alike, the ability to produce high-quality, intricate designs is paramount. One product that has gained significant traction in maker communities is the 3D Clock SVG Laser Cut File CNC File. This isn't just a simple template; it is a comprehensive digital toolkit designed to help you create stunning, multi-layered wall clocks that stand out in both form and function.
Whether you are looking to add a unique touch to your home decor or seeking a profitable item for your Etsy shop, understanding how to utilize these files effectively is crucial. This guide breaks down everything you need to know about working with this specific digital product, from file compatibility to cutting strategies.
Why Choose a 3D Layered Design?
Gone are the days when clock faces were limited to flat, single-material discs. Modern interior design favors depth, texture, and visual interest. A 3D clock achieves this by stacking multiple layers of material—typically wood, acrylic, or foam board—to create a sense of dimension. The shadows cast by each layer interact with ambient light, giving the clock a dynamic appearance that changes throughout the day.
The primary advantage of using a pre-designed 3D Clock SVG Laser Cut File CNC File is precision. Achieving perfect alignment across five, ten, or even twenty layers manually is nearly impossible without specialized jigs. These digital files come with pre-calculated registration marks and precise vector paths, ensuring that every gear, number, and decorative element sits exactly where it should be. This level of accuracy is what separates a amateur attempt from a professional-grade finish.
Understanding Your Digital Toolkit
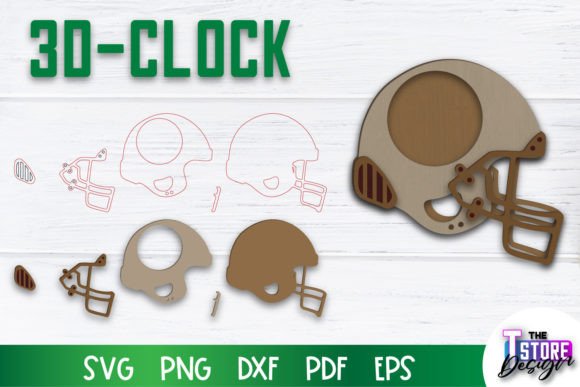
When you purchase this digital product, you aren't just receiving one file; you are gaining access to a versatile suite of formats designed to work with various software ecosystems. The package includes a zip archive containing:
- 1 SVG File: The industry standard for laser cutters. Scalable and editable, this allows you to adjust sizes and modify elements if needed.
- 1 EPS File: Ideal for vector graphics software like Adobe Illustrator, offering robust compatibility for professional designers.
- 1 PNG File (Transparent): Perfect for previewing the design or using in graphic design programs that require raster images with clear backgrounds.
- 1 PDF File: Useful for documentation or printing reference guides directly from the source.
- 1 DXF File: Essential for users who prefer CAD-based workflows or specific CNC routing software.
This variety ensures that no matter what machine or software you use, you have the right tool for the job. If you require a different file type, such as a CDR file for CorelDRAW, or need a resized PNG for social media promotion, the seller encourages direct communication. Personalized support is a hallmark of good digital product services, ensuring your project stays on track.
Cutting Instructions: Reading the Lines
One of the most critical aspects of preparing your 3D Clock SVG Laser Cut File CNC File is understanding the color-coding system embedded within the vectors. Misinterpreting these lines can lead to ruined materials and wasted time. Here is the universal standard used in this file:
RED Line = CUT
Any path colored red indicates the laser or blade needs to slice completely through the material. These are the outer boundaries of your clock pieces and any internal holes that need to be fully removed.
BLACK Line = ENGRAVE
Paths colored black are designated for engraving. The laser will burn or etch the surface without cutting all the way through. This is often used for text, subtle patterns, or shading effects that add depth to the clock face.
Before sending your file to the machine, always double-check these colors in your software. Some older versions of laser control software may default to black for both functions, which can result in accidental cuts where engraving was intended. Adjusting these settings manually ensures safety and precision.
Software Compatibility and Workflow Integration
While the files are widely compatible, success depends on your software setup. Most modern laser cutting software, including LightBurn, RDWorks, and even basic versions of Adobe Illustrator or Inkscape, can handle SVG and DXF formats. However, it is vital to ensure your software recognizes the layered structure of the clock.
For complex 3D projects, organizing your layers in the software is just as important as the cutting itself. Create separate layers for each physical tier of the clock. Label them clearly (e.g., "Layer 1 - Base," "Layer 2 - Numbers"). This organization prevents confusion during the assembly phase and helps you manage power settings for different materials. For instance, you might need higher power for cutting thick basswood but lower power for engraving delicate details on acrylic.
Material Selection and Practical Considerations
The aesthetic outcome of your 3D Clock SVG Laser Cut File CNC File project relies heavily on material choice. Wood remains the most popular option due to its warm, natural look and ease of cutting. Basswood and birch plywood are favorites because they have consistent grain and minimal warping. Acrylic offers a sleek, modern, translucent look, though it requires specific lens settings to avoid melting or cracking.
Consider the thickness of your material when planning your build. Thicker materials allow for more dramatic layering but require stronger adhesives to hold the stack together. Thin materials are easier to align but may lack the structural integrity needed for larger clocks. Always test cut a small section of your material before committing to the full run to verify focus height and power levels.
Assembly Tips for a Professional Finish
Cutting the parts is only half the battle. Assembly is where the magic happens. To achieve a seamless 3D effect:
- Deburr Edges: After cutting, lightly sand the edges of wooden pieces to remove char or roughness. This improves the fit and final appearance.
- Use Registration Marks: Most 3D clock files include small circles or crosses on the corners. Align these precisely when gluing layers together. Even a millimeter of misalignment can throw off the entire clock mechanism.
- Choose the Right Adhesive: For wood, a strong PVA glue or wood glue works well. For acrylic, consider a solvent-based cement that fuses the plastic. Avoid hot glue unless necessary, as it can create visible lumps and uneven surfaces.
- Install the Mechanism Early: It is often easier to install the clock movement before applying the final top layer. Ensure the shaft passes cleanly through all layers without binding.
Expanding Your Creative Horizons
Once you master the basics, the possibilities are endless. You can customize the font styles, change the color scheme of the engravings, or add personal touches like initials or dates. The flexibility of the SVG format means you can tweak the design to suit specific themes—minimalist for modern offices, rustic for farmhouse decor, or whimsical for children's rooms.
If you encounter any technical hurdles, or if you need assistance adapting the design for a non-standard size, do not hesitate to reach out. Direct communication with the creator can provide insights that manuals cannot, such as recommended DPI settings for your specific printer or tips for handling tricky vector intersections.
Conclusion
The 3D Clock SVG Laser Cut File CNC File represents more than just a download; it is an invitation to explore the intersection of technology and craftsmanship. By leveraging the included SVG, EPS, PNG, PDF, and DXF files, and adhering to the red-cut/black-engrave guidelines, you can produce high-value, visually striking products. Whether you are enhancing your own living space or building a brand around handmade goods, this file provides the foundational tools for success. Thank you for visiting my shop, and happy crafting!