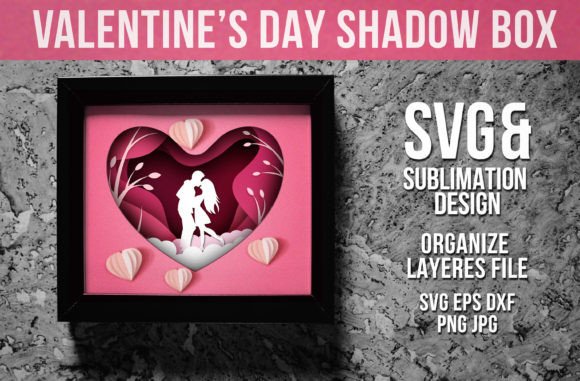
3d Heart Shadow Box, Valentine, Love: A Practical Guide to Crafting Depth and Dimension
The 3d Heart Shadow Box, Valentine, Love represents more than just a seasonal craft project; it is a sophisticated intersection of digital design and tactile artistry. For creators, hobbyists, and small business owners alike, this specific type of layered paper engineering offers a unique opportunity to produce high-value, visually striking gifts or decor items that stand out in a crowded market. Unlike flat greeting cards or simple printed signs, a shadow box utilizes depth to create an illusion of space, turning a two-dimensional concept into a three-dimensional experience. However, achieving that professional polish requires more than just cutting paper—it demands an understanding of layering, alignment, and material selection.
Many enthusiasts dive into shadow boxing with enthusiasm but often overlook the technical nuances that separate a amateur attempt from a gallery-worthy piece. The most common pitfall is underestimating the importance of precision in both file selection and physical assembly. When you are working with intricate designs like a heart motif composed of multiple layers, even a millimeter of misalignment can disrupt the entire visual narrative. This guide aims to help you navigate these challenges, ensuring your final product is not only beautiful but also structurally sound and professionally finished.
Selecting the Right Digital Assets for Your Project
The foundation of any successful shadow box lies in the quality of the digital files used to cut the layers. Not all SVG or DXF files are created equal. Some designs are overly complex, featuring tiny internal details that are nearly impossible to weed out without damaging delicate structures. Others may lack proper layer separation, forcing you to manually trace or redesign elements—a time-consuming process that defeats the purpose of using pre-made templates.
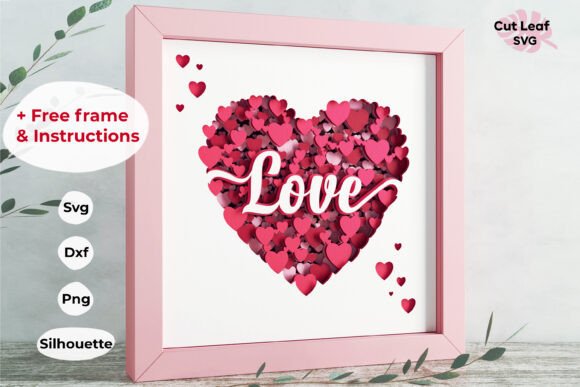
When evaluating a 3d Heart Shadow Box, Valentine, Love download, look for files that are explicitly organized by layer number. In our included package, the design consists of 6 distinct layers, each numbered to guide you through the cutting and assembling process in the correct order. This logical progression is crucial. If the layers are not numbered or if the sequence is unclear, you risk assembling the box backwards, which can result in a muddled appearance where foreground elements obscure background details instead of framing them.
Furthermore, verify the scalability of the files. While many projects are designed for standard frames, flexibility is key. The included files are sized to fit an 8.5 x 8.5 inner size frame and are ready to cut from standard 8.5×11-inch cardstock. However, they are also scalable to any desired size. This means you can experiment with larger displays for wall art or smaller versions for place cards, provided you maintain the aspect ratio and adjust your cutting settings accordingly.
Understanding File Formats and Software Compatibility
One of the biggest sources of frustration for crafters is file compatibility. You might purchase a beautiful design only to find it won’t open in your preferred software. To ensure a seamless workflow, it is essential to choose packages that offer versatile format options. The listing includes a comprehensive suite of formats designed to accommodate various tools and skill levels:
- 1 SVG: Ideal for use with Cricut Design Space and Silhouette Designer Edition. This is the most common format for hobbyist cutting machines.
- 2 DXF: Compatible with CNC machines and Silhouette Basic Edition, offering broader accessibility for those without premium software subscriptions.
- SILHOUETTE STUDIO FILE: Specifically prepared for seamless use with Silhouette Studio, ensuring that all layer groups and cut lines are preserved exactly as intended.
- EPS: A vector format suitable for Adobe Illustrator, Corel Draw, Inkscape, Make The Cut, etc., allowing for advanced editing and customization by professionals.
- PNG: A photo format with a transparent background, useful for printing or as a reference image during assembly.
By providing these varied formats, the design ensures that whether you are a beginner using a basic cutter or a pro using industrial equipment, you have the tools necessary to execute the vision. Always check your software version before downloading to ensure compatibility, though these standard formats are widely supported across the industry.
Avoiding Common Assembly Mistakes
Even with perfect files, the physical assembly of a shadow box can go wrong due to material choice or adhesive application. One frequent error is using paper that is too thin. Standard printer paper lacks the rigidity needed to hold its shape within a deep frame, leading to sagging or warping over time. Instead, opt for medium-weight cardstock, typically between 80lb and 110lb. This weight provides enough structure to stand upright while remaining easy to cut through your machine.
Another critical mistake involves the cutting process itself. Ensure your blade is sharp and your mat is clean. Dull blades can tear the paper rather than slicing cleanly, resulting in fuzzy edges that detract from the crisp look of the shadow box. Additionally, always perform a test cut on scrap paper first. This allows you to adjust the pressure and speed settings on your machine, preventing wasted materials and frustrating re-cuts.
Adhesive selection is equally important. Avoid glues that are too wet, as they can warp the cardstock and show through lighter colors. Double-sided tape dots or foam tape are excellent choices because they add dimension without adding bulk or moisture. Foam tape is particularly effective for shadow boxes, as it lifts each layer slightly off the one below it, enhancing the 3D effect. However, be mindful of the total thickness when choosing your frame depth. If the layers are too thick, they may not fit inside the frame, or they may press against the glass, ruining the floating effect.
Maximizing Value and Presentation
For entrepreneurs and sellers, the presentation of the 3d Heart Shadow Box, Valentine, Love can significantly impact perceived value. A well-assembled shadow box looks expensive and thoughtful. Use the included PDF instructions and Layers Guide to ensure every customer receives a clear roadmap for assembly. If you are selling pre-made boxes, consider including a small note about the care instructions, such as avoiding direct sunlight to prevent fading, which adds a touch of professionalism.
Moreover, think about the context in which your shadow box will be displayed. Valentine’s Day is not just about romance; it is also about friendship and self-love. By creating versatile designs that can be customized with different color palettes or additional text, you can appeal to a wider audience. The ability to scale the files means you can create matching sets—large wall art paired with smaller keepsake boxes—creating a cohesive brand identity.
Final Thoughts on Execution
Creating a stunning 3D shadow box is a rewarding process that blends creativity with technical precision. By starting with high-quality, well-organized files, choosing the right materials, and paying attention to the details of assembly, you can produce results that exceed expectations. Remember, the goal is not just to make a heart shape, but to create a sense of depth and emotion that resonates with the viewer. Take your time, follow the numbered layers, and enjoy the satisfaction of bringing a digital design to life in tangible form.