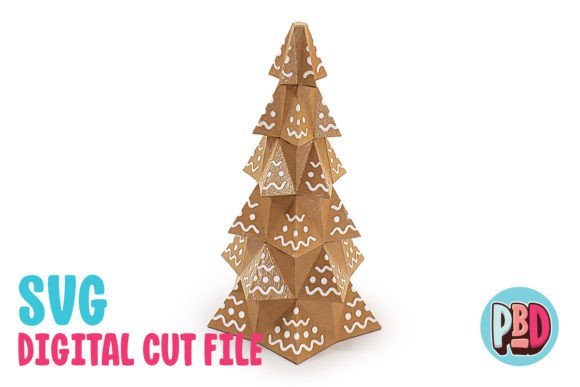
Gingerbread Christmas Tree 3D Papercraft
The holiday season is a time of tradition, warmth, and creativity. While many people turn to store-bought decorations to set the mood in their homes, there is a growing movement toward handmade, personalized decor that adds a unique touch to any space. Among these creative endeavors, the Gingerbread Christmas Tree 3D Papercraft has emerged as a standout project for crafters, families, and interior design enthusiasts alike. This intricate model combines the nostalgic charm of gingerbread with the structural elegance of three-dimensional papercraft, resulting in a decorative piece that is both visually striking and deeply satisfying to build.
Unlike flat paper ornaments or simple cutouts, this specific design offers depth and dimension, transforming a standard sheet of cardstock into a lifelike representation of a festive tree. Whether you are looking to add a whimsical element to your mantelpiece, create a centerpiece for a holiday party, or simply enjoy a rewarding weekend project, understanding the nuances of this papercraft can help you achieve professional-looking results. The following guide explores the features, construction requirements, and practical applications of this popular digital download, providing you with the knowledge needed to bring this holiday classic to life.
Design Features and Aesthetic Appeal
At its core, the Gingerbread Christmas Tree 3D Papercraft is designed to mimic the appearance of a decorated gingerbread house or cookie, complete with textured details that suggest icing, sprinkles, and baked dough. One of the most appealing aspects of this design is its scale. Measuring approximately 6 inches wide by 6 inches deep by 10.5 inches high, it strikes a perfect balance between being large enough to command attention on a shelf or table and small enough to fit comfortably in various indoor settings. This size makes it versatile enough to be used as part of a larger display or as a standalone accent piece.
The aesthetic value of this papercraft lies in its ability to evoke nostalgia while maintaining a modern, clean look. The geometric precision of the 3D structure contrasts beautifully with the organic, playful theme of gingerbread. When assembled correctly, the layers of the tree create shadows and highlights that enhance its visual depth. Furthermore, the instructions include specific texturing tips, allowing builders to go beyond the basic assembly and customize the surface appearance. These tips might involve using colored pencils, markers, or even edible-safe dusts (for non-edible displays) to simulate the rough texture of gingerbread or the glossy sheen of candy decorations. This level of customization ensures that no two finished trees are exactly alike, adding a personal signature to your holiday decor.
Material Requirements and Construction Quality
To achieve the sturdy, upright structure required for a 3D model of this nature, material selection is critical. The instructions explicitly state that this design is intended to be built using 65 lb. cardstock or heavier. Using lighter paper may result in a fragile model that cannot support its own weight or maintain its shape over time. Heavier cardstock provides the necessary rigidity to hold the complex joints and tabs together without sagging or warping.
A full material list is provided within the PDF instructions, which typically includes not only the cardstock but also adhesives such as glue sticks or liquid glue, sharp scissors or a cutting machine, and possibly bone folders for scoring folds. Preparing your workspace with these materials beforehand ensures a smooth building process. It is worth noting that because the model is three-dimensional, the assembly process involves precise folding and gluing of multiple components. Patience is key; rushing the process can lead to misaligned edges or weak bonds. However, the reward is a durable decoration that can be stored and reused year after year if handled with care.
Digital File Formats and Software Compatibility
One of the significant advantages of purchasing this papercraft as a digital download is the flexibility it offers regarding how you choose to cut the pieces. The download package includes a single ZIP file containing three distinct formats: an SVG Cut File, a DXF Cut File, and PDF Instructions. Understanding the differences between these formats is essential for ensuring a successful build, particularly if you plan to use a computer-controlled cutting machine like a Cricut or Silhouette.
Using SVG Files for Precision Cutting
The SVG (Scalable Vector Graphics) format is generally the preferred choice for users with advanced cutting machines. SVG files can be used with Silhouette Designer Edition and above or Cricut Design Space. These formats allow for precise scaling and editing, meaning you can adjust the size of the tree before cutting to fit specific spaces. The vector lines in an SVG file are clean and crisp, resulting in accurate cuts and minimal waste. If you have access to these software platforms, starting with the SVG file is highly recommended for the best possible outcome.
Navigating DXF Files for Basic Users
For those who prefer to use Silhouette Basic Edition or other software that supports DXF (Drawing Exchange Format), the package also includes a DXF version. However, it is important to note that DXF files can present certain technical challenges. They often open more slowly in Silhouette Studio compared to SVG files, and the line quality may not be as clean, potentially leading to slightly less precise cuts.
Crucial Setup Step: To ensure the DXF file loads properly and aligns correctly within your software, you must adjust your import preferences. Follow these steps carefully:
- Edit Preferences in your software.
- Select Import DXF.
- Change the setting from “As-is” to “Centered.”
Failing to make this adjustment may result in the design appearing off-center or scaled incorrectly on your cutting mat. If you encounter difficulties with the DXF file, remember that switching to the SVG file (if your software allows) is often a smoother alternative.
Practical Applications and Use Cases
The versatility of the Gingerbread Christmas Tree 3D Papercraft extends far beyond simple home decoration. Its compact size and thematic appeal make it suitable for a variety of scenarios:
- Holiday Parties and Events: Place several trees on dining tables as centerpieces. Their uniform yet charming appearance adds a cohesive theme to the event without overwhelming guests.
- Gift Giving: Completed trees can serve as thoughtful, handmade gifts for friends and family. You can customize the color scheme or add small embellishments to tailor the gift to the recipient’s taste.
- Educational Projects: For educators and parents, this project offers an excellent opportunity to teach children about geometry, spatial reasoning, and fine motor skills. The step-by-step nature of the build encourages patience and attention to detail.
- Retail and Display: Small business owners can use these models in window displays or on shelves to create a festive atmosphere that attracts customers during the holiday shopping season.
Evaluating Suitability and Final Considerations
Before beginning your project, it is helpful to assess whether this papercraft aligns with your current skill level and available resources. If you are new to papercrafting, this project serves as a moderate challenge that is achievable with careful reading of the instructions. The inclusion of texturing tips means that even beginners can elevate their final product with a bit of extra effort.
However, keep in mind that all files must be extracted from the ZIP folder before use. This is a common oversight that can cause confusion if the files appear corrupted or unreadable. Once extracted, verify that your cutting machine is calibrated correctly for the thickness of your chosen cardstock. Test cuts on scrap paper are always advisable to ensure the blade depth and pressure are appropriate.
In conclusion, the Gingerbread Christmas Tree 3D Papercraft is more than just a seasonal decoration; it is a testament to the joy of creating something tangible and beautiful from digital blueprints. By leveraging the right tools, adhering to material guidelines, and embracing the creative possibilities offered by texturing and customization, you can produce a stunning addition to your holiday decor. Whether you are a seasoned crafter or a curious beginner, this project offers a rewarding blend of technical precision and artistic expression, making it a worthy investment of your time during the holidays.