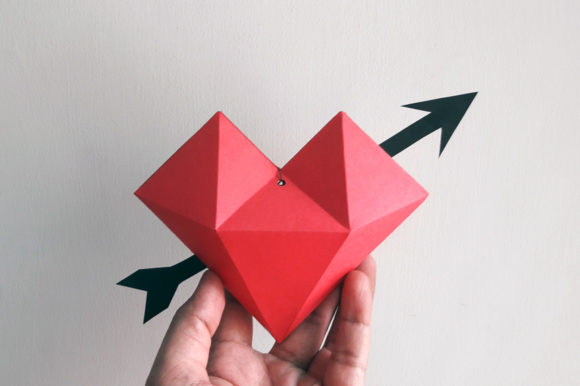
Heart Dangler - 3d Papercraft
There is a specific kind of satisfaction that comes from creating something tangible with your own hands, especially when the result is as visually striking as the Heart Dangler - 3d Papercraft. This isn’t just another clipart image or a mass-produced plastic ornament. It is a geometric marvel—a polygonal, faceted heart that relies on precision and patience to transform flat paper into a three-dimensional object. For many hobbyists, educators, and even entrepreneurs looking for unique merchandise ideas, this project offers a blend of artistic expression and structural engineering. However, before you download the files and start cutting, it is crucial to understand exactly what you are getting, how to avoid common pitfalls, and why this particular design stands out in the crowded market of digital crafts.
Understanding the Product: Digital vs. Physical
The most significant misunderstanding potential buyers encounter is assuming they are purchasing a physical model. The Heart Dangler - 3d Papercraft is strictly an instant digital download. You are buying the instructions and templates, not the finished item. This distinction is vital for managing expectations. If you are looking for a ready-to-hang decoration to put up immediately, this product will disappoint you. But if you view crafting as a rewarding process—a way to spend twenty to thirty minutes disconnecting from screens and engaging in focused manual work—then this digital asset is incredibly valuable.
By providing only the PDF templates, we keep costs low while giving you the flexibility to customize. The templates are supplied in plain black and white, which might seem stark at first glance, but this is actually a feature, not a bug. It allows you to choose your own color palette. Do you want a classic red for Valentine’s Day? A sleek silver for modern decor? Or perhaps a vibrant neon for a youthful touch? The choice is entirely yours, provided you have the right materials on hand.
Common Mistakes and How to Avoid Them
Even simple papercraft projects can go wrong if you rush through the preparation phase. Here are the most frequent errors we see beginners make when working with geometric models like the Heart Dangler, along with practical advice on how to correct them.
Ignoring the Importance of Cardstock Weight
A common mistake is using standard printer paper (80 GSM) for the final build. While it works for practice runs, standard paper is too flimsy to hold the complex folds required for a 3D structure. The heart will likely sag, lose its shape, or tear at the glue points. To achieve the "pretty cool" geometrical design mentioned in our description, you need stability. Use white colored cardstock, ideally between 160gsm and 200gsm. This weight provides enough rigidity to maintain the faceted look without being so thick that your scissors struggle to cut clean lines.
Misinterpreting the Template Colors
The templates include color codes such as COLOR A or COLOR B printed at the top of each page. Beginners often ignore these labels, leading to mismatched facets. In a polygonal construction, adjacent faces must be distinct colors or shades to create the illusion of depth and lighting. If you print all parts on the same solid color paper without considering the shading instructions, the 3D effect will vanish, and the heart will look flat and confusing. Always check the color key before you commit to gluing pieces together.
Rushing the Scoring Process
You might be tempted to skip scoring—the act of creasing the paper along fold lines—and just bend it. This results in ragged edges and uneven angles. A non-working ballpoint pen or a bone folder is essential here. By pressing firmly along the designated lines before folding, you ensure crisp, professional-looking edges. This step takes an extra minute per piece, but it dramatically improves the overall quality and durability of the final model.
What You Need to Succeed
To get the best results from the Heart Dangler - 3d Papercraft, ensure you have the following tools ready. Missing one of these can turn a relaxing afternoon into a frustrating ordeal.
- Printer: Ensure your printer is calibrated for full-size A4 printing. Scaling the template down or up by even a few percent will cause the assembly numbers to misalign, making the model impossible to build.
- White Colored Cardstock: As mentioned, the weight matters. Stick to high-quality cardstock for the best structural integrity.
- Glue: A fine-tip glue stick or liquid PVA glue works best. Avoid superglue, which can fog up the paper surface and ruin the aesthetic.
- Craft Knife and Scissors: Use scissors for rough cuts and a craft knife with a self-healing mat for precise internal cuts and intricate details.
- String or Thread: Since this is a dangler, you need a sturdy thread to hang it. Whether in your car, room, or window, the string needs to support the weight of the cardstock without snapping.
Assembly and Final Touches
Once you have printed the three-page template set and the two-page instruction guide, the actual building time should take around 20–30 minutes. The instructions are designed to be intuitive, guiding you through matching the assembly numbers. Start by cutting out all the pieces, then score every fold line. Assemble the smaller facets first, ensuring the glue dries completely before moving to the next section. Finally, join the larger sections together.
The finished dimensions—Height: 5.9 inches, Width: 7.2 inches, Depth: 2.5 inches—make this a substantial piece. It is large enough to be noticed but small enough to fit comfortably in a rearview mirror or a bedroom window. The interplay of light on the polygonal facets creates a dynamic visual effect that changes depending on where you place it. This makes it a perfect gift for Valentine’s loved ones who appreciate handmade, thoughtful gestures over generic store-bought items.
Why Choose This Design?
In a world of digital ephemera, holding a well-crafted 3D object feels grounding. The Heart Dangler - 3d Papercraft is not just about the end result; it is about the mindful process of creation. It teaches precision, spatial awareness, and the joy of seeing a plan come to life. Whether you are a beginner looking for a manageable first project or an experienced crafter wanting a quick, elegant decoration, this template set offers a balanced challenge. Remember, the key to success lies in preparation: use the right paper, respect the scoring lines, and pay attention to the color codes. Do this, and you will have a stunning geometric heart that looks far more impressive than the sum of its parts.